BoltDB Internals
BoltDB是一个Go写的kv数据库,参考于LMDB,是很好的数据库入门材料。
LMDB特别值得注意的技术点:
- 采用B+Tree
- 采用mmap避免了user<->kernel之间昂贵的内存拷贝,利用文件系统和操作系统的缓存管理规避了数据库复杂的Buffer Manager管理
- 采用Copy-on-Write策略避免了复杂的锁机制,保证并发操作时的数据完整性
- Single Writer + N Readers (RW互相不阻塞)
下面会介绍BoltDB的全貌和核心技术点,依次为数据组织、索引操作、事务实现。由于各个部分相互交织,可以先总览一遍有了high-level印象后,再进入细节梳理。
数据组织
boltdb数据结构之间的关系如下:
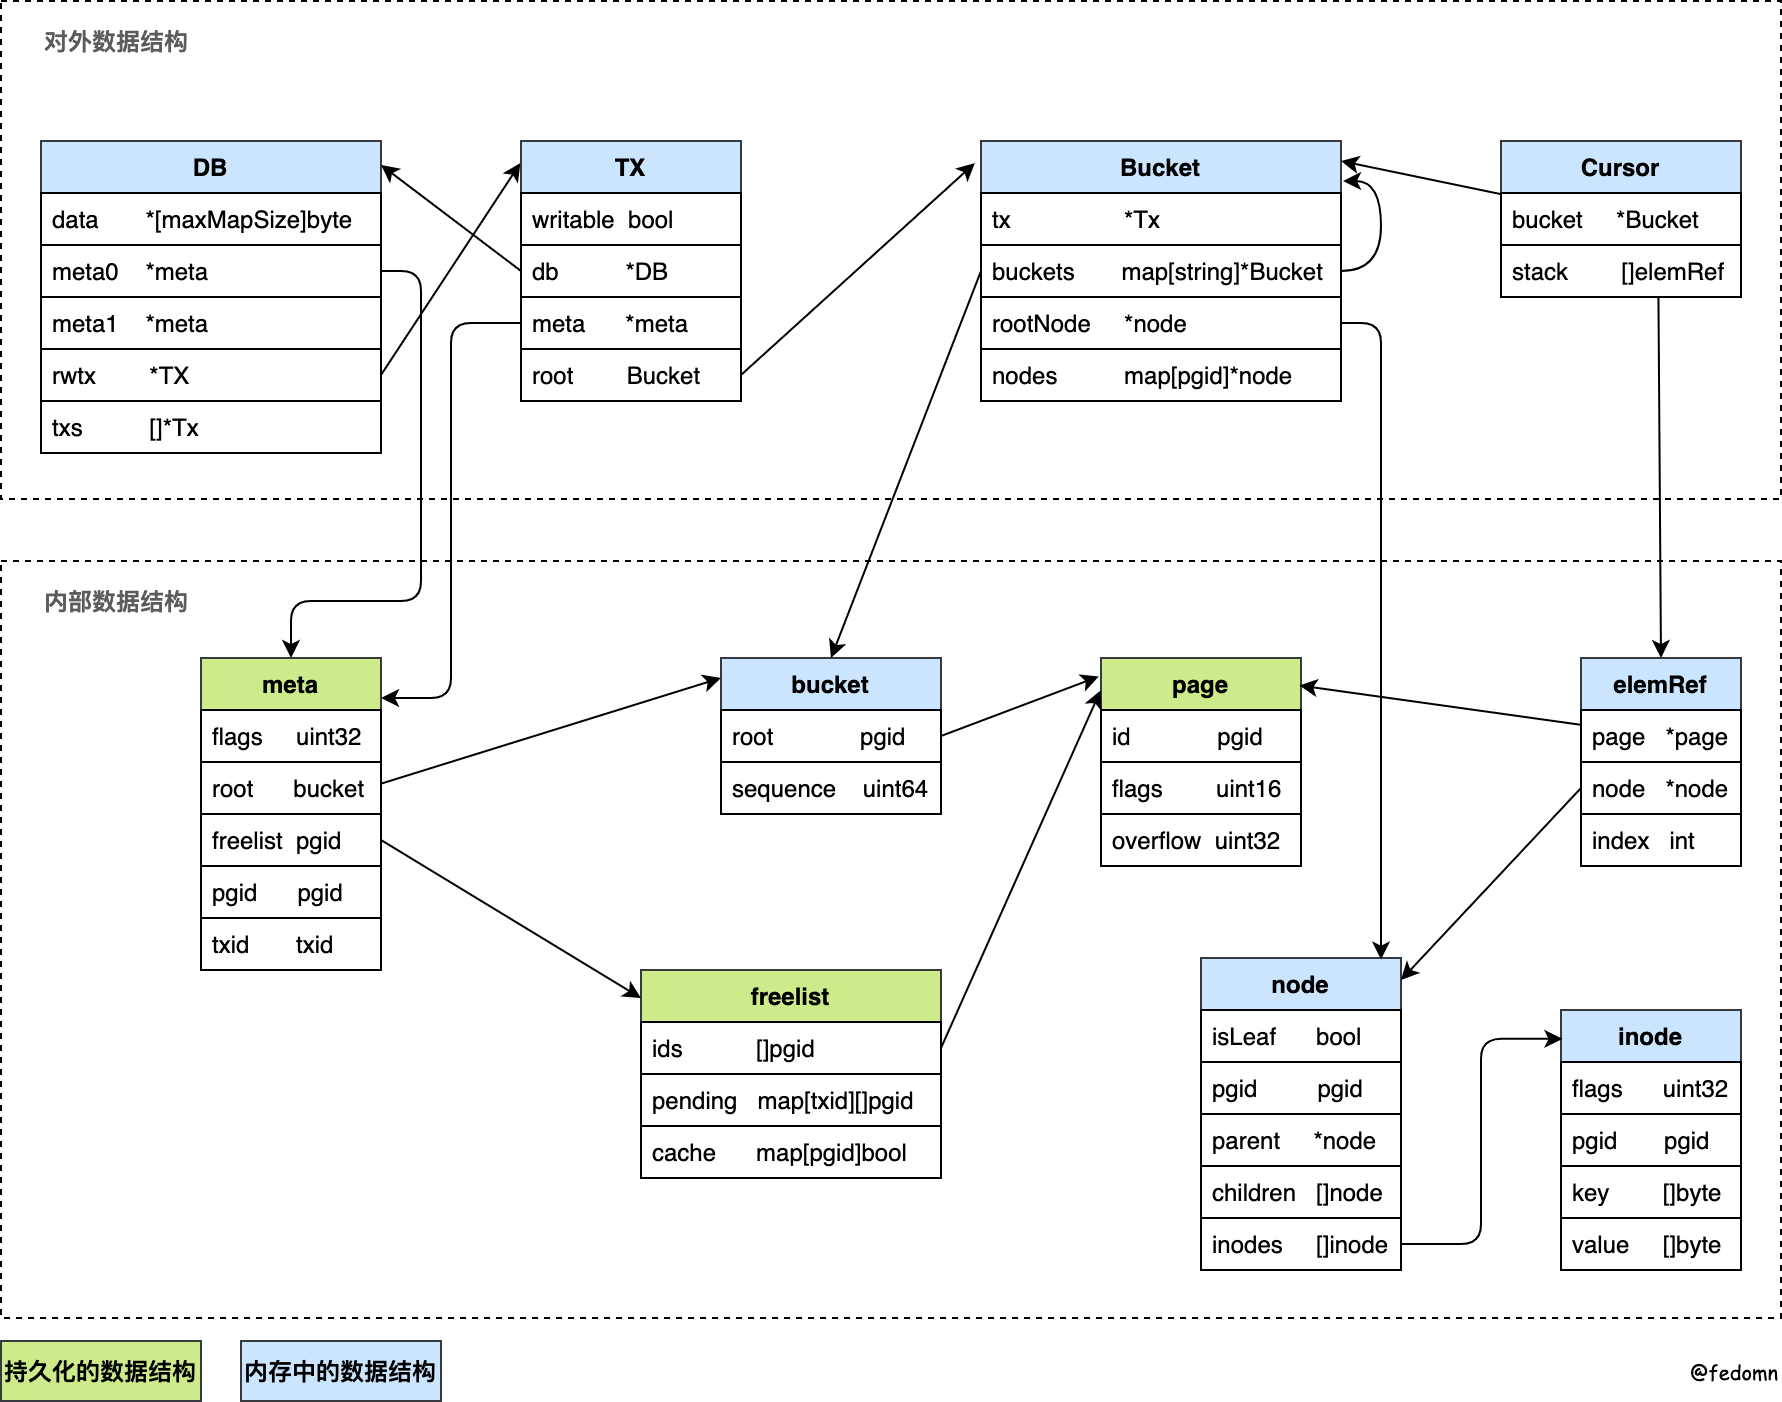
- 对外数据结构
- DB:代表一个数据库,对应一个文件,内部包含多个buckets
- TX:对数据库所有操作都应该在事务中进行
- Bucket:它是boltdb组织数据的基础结构。它内部可以存在多个Bucket(相当于1个DB文件内有多个database)
- Cursor:用来定位Bucket内的数据
- 内部数据结构
- meta:存储数据库的元信息
- bucket:用来持久化上面Bucket的数据结构,包含了当前Bucket的Root所在pageid
- freelist:管理空闲page
- page:boltdb存储的基本单位
- elemRef:cursor定位的数据,可以是internal node或leaf node
- node:代表 在内存中 deserialized后的page
- inode:代表一个node中的存储的kv节点
db file disk layout
数据库需要持久化,结合上图数据结构,boltdb以page为单位操作磁盘读写,整体的db file磁盘layout如下:

- meta page:存储DB的一些元信息
- freelist page:管理DB的page分配
- leafPage or branchPage:对应B+Tree的internal node和leaf node
page layout
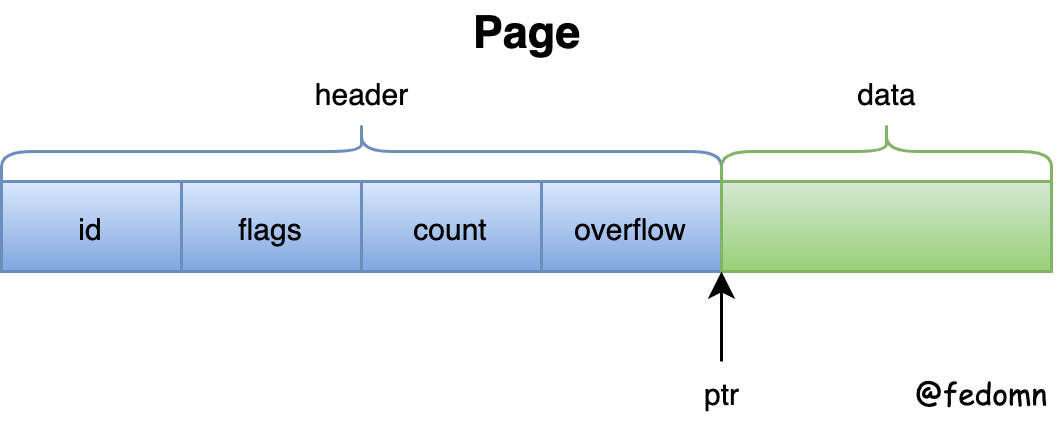
- id:page的id号,是个uint64
- flags:page类型标志。分为:metaPageFlag、freelistPageFlag、branchPageFlag、leafPageFlag
- count:page中存储的k数量,用于branchPage或leafPage中
- overflow:数据溢出当前page,用overflow表示后续的N个page都是当前page的数据。overflow的后续page只存放data,不存header
- ptr:指向page数据起始位置的指针
meta layout
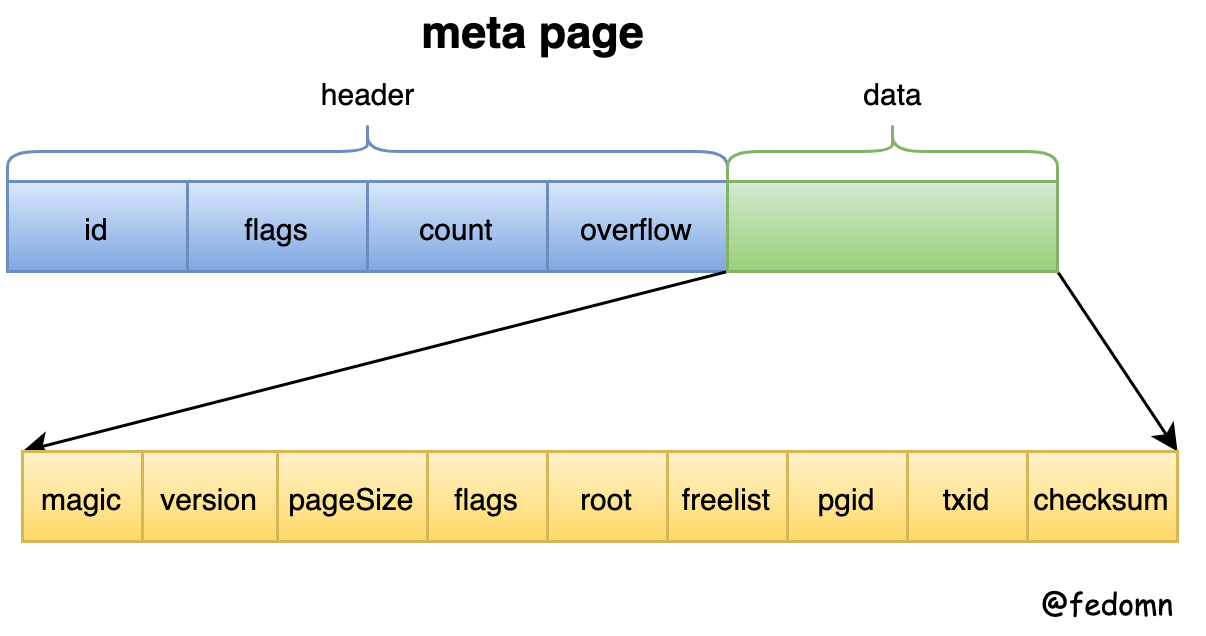
- magic:a marker value表明是bolt db文件,值为
0xED0CDAED - version:boltDB版本号
- pageSize:boltDB page size
- flags:保留字段未使用
- root:保存boltDB树根bucket信息
- freelist:freelist对应的pageid
- pgid:当前boltDB的page总个数,初始化时为4,随着每次page allocate而增加。为了防止写的page到期望之外
- txid:上一次的事务ID,写时加一,读时不变。用于追踪数据库最新版本
- checksum:以上字段的校验和。区别meta page正确性
freelist layout
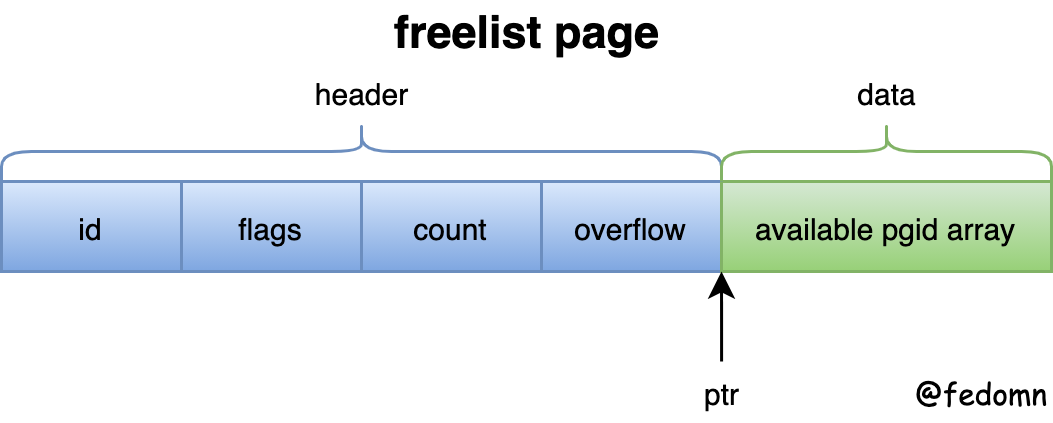
freelist是管理空闲页的数据结构,最终会将free和pending-free的page记录到磁盘上。那它到底是什么呢?
我们知道BoltDB初始化时,会默认创建4个page,并通过mmap映射到进程中。随着BoltDB的插入操作,DB文件变大,就需要重新re-mmap。
但是随着BoltDB的更新操作增多,采用COW原则,每次会将原来page free,再写入新的page。所以这个过程中,就产生了free pages。
这些free pages由一个单独的freelist layout page记录起来。同时,由于BoltDB的DB file大小只会随着操作grow变大,但文件大小不会缩减。所以,每次在openDB的时候,会将这些freelist加载到内存中,以供后续写操作重复利用。
branchPage layout
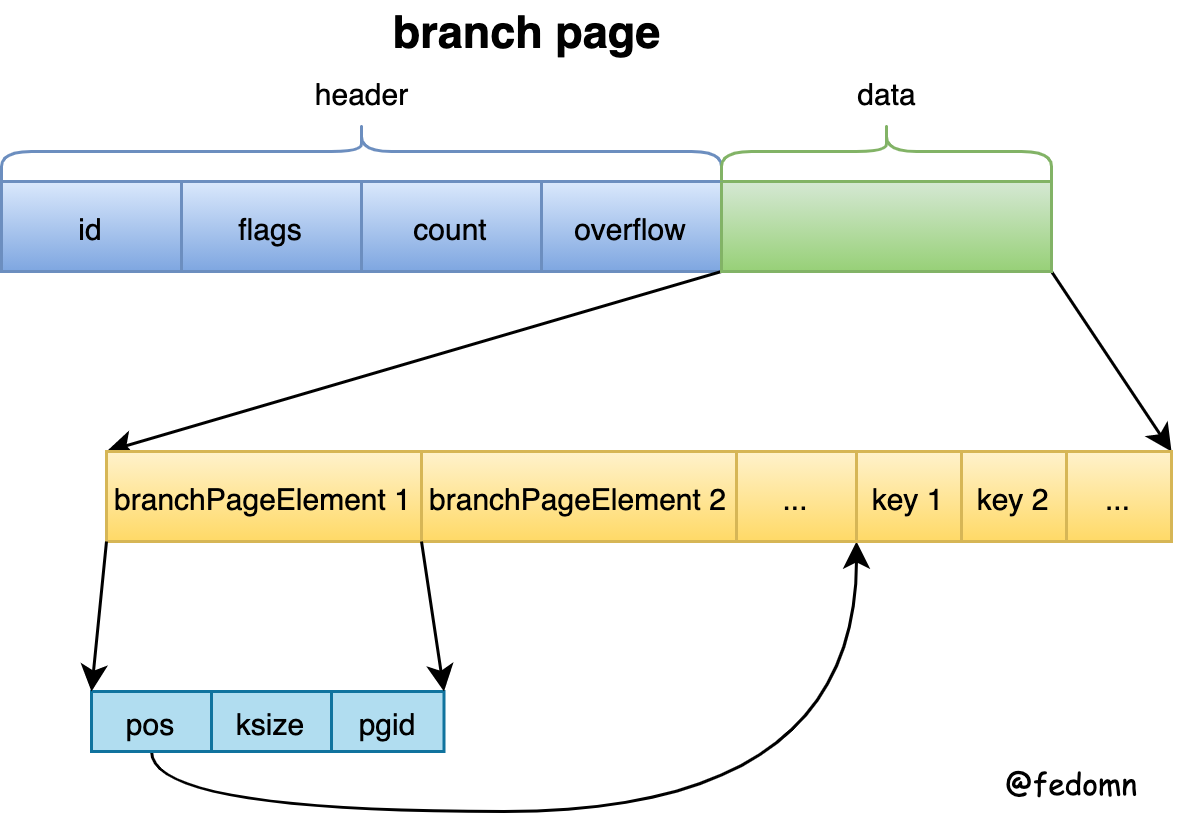
branch代表B+Tree中的internal node,它只存储索引数据,不会存储value
- branchPageElement:代表B+Tree internal node中的一个节点
- pos:存储的key在当前page的页面偏移
- ksize:存储的key的大小
- pgid:当前internal node中节点对应的child
所以,取一个branchPageElement的key方法为:
unsafeByteSlice(unsafe.Pointer(n), 0, int(n.pos), int(n.pos)+int(n.ksize))
leafPage layout
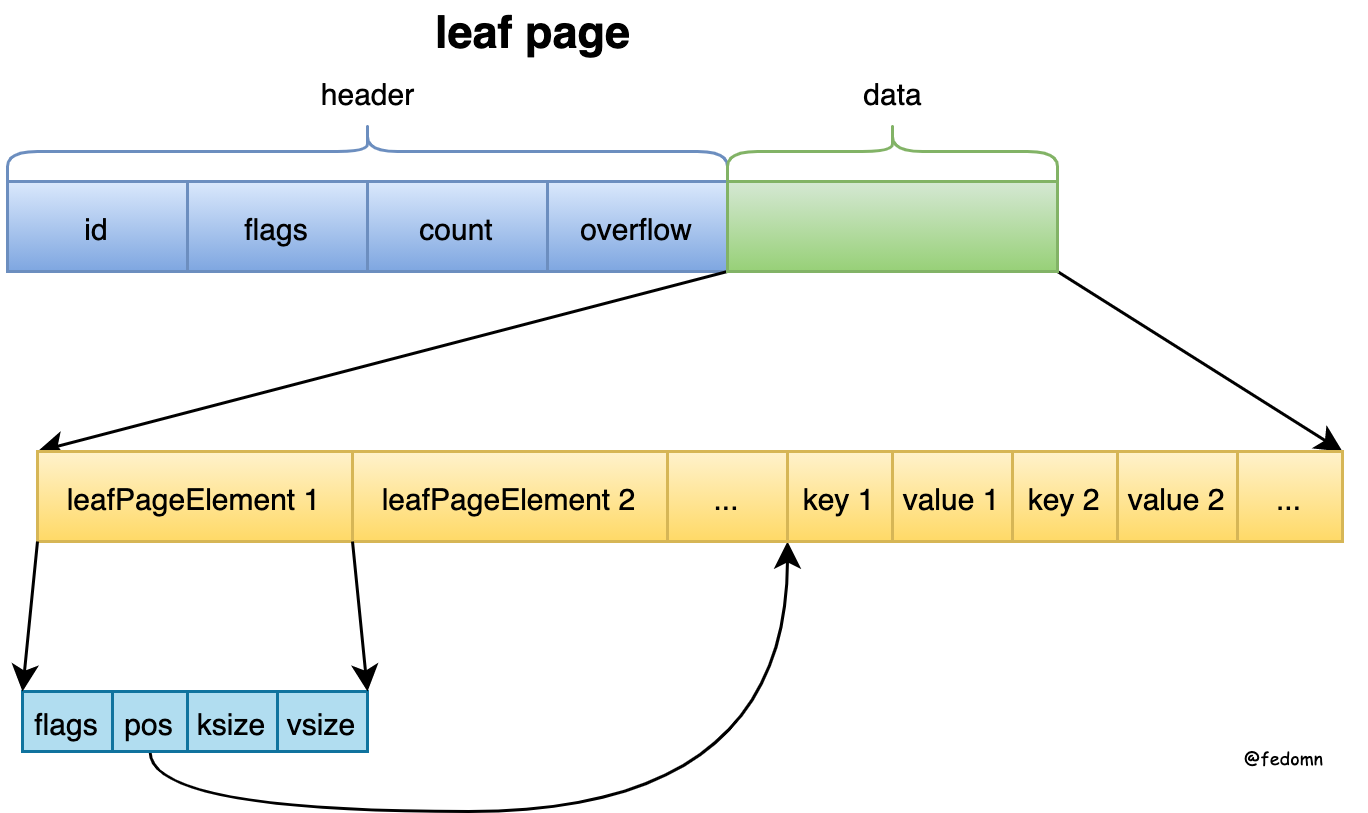
leafPage代表B+Tree的leaf node,它同时存放key和value。
- leafPageElement:代表B+Tree leaf node中的一个节点
- flags:由于boltDB的sub-bucket也是包含在同一棵B+Tree里,所以通过flags来标记当前leaf node的节点是leaf,还是sub-bucket
- pos:存储的key在当前page的页面偏移
- ksize:存储的key的大小
- vsize:存储的value的大小
sub-bucket leafPage layout
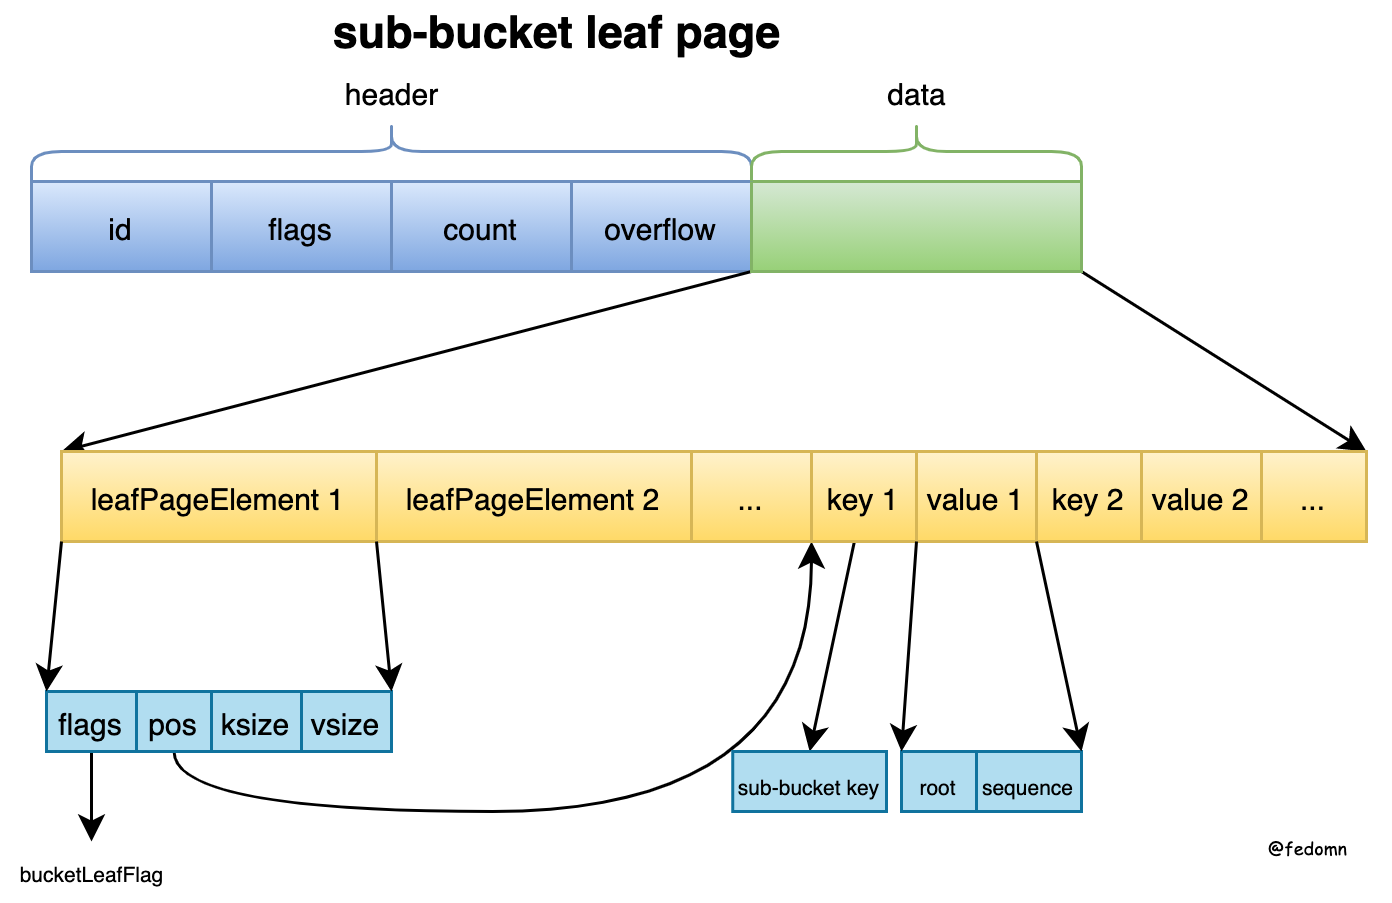
sub-bucket leafPage相对于普通的leafPage来说,主要是key和value存储的值区别
- leafPageElement
- key:sub-bucket的key,即这个bucket的名字
- value:指向子bucket的root信息
- root:sub-bucket的root pgid
- sequence:每个bucket的自增id
inline bucket leafPage layout
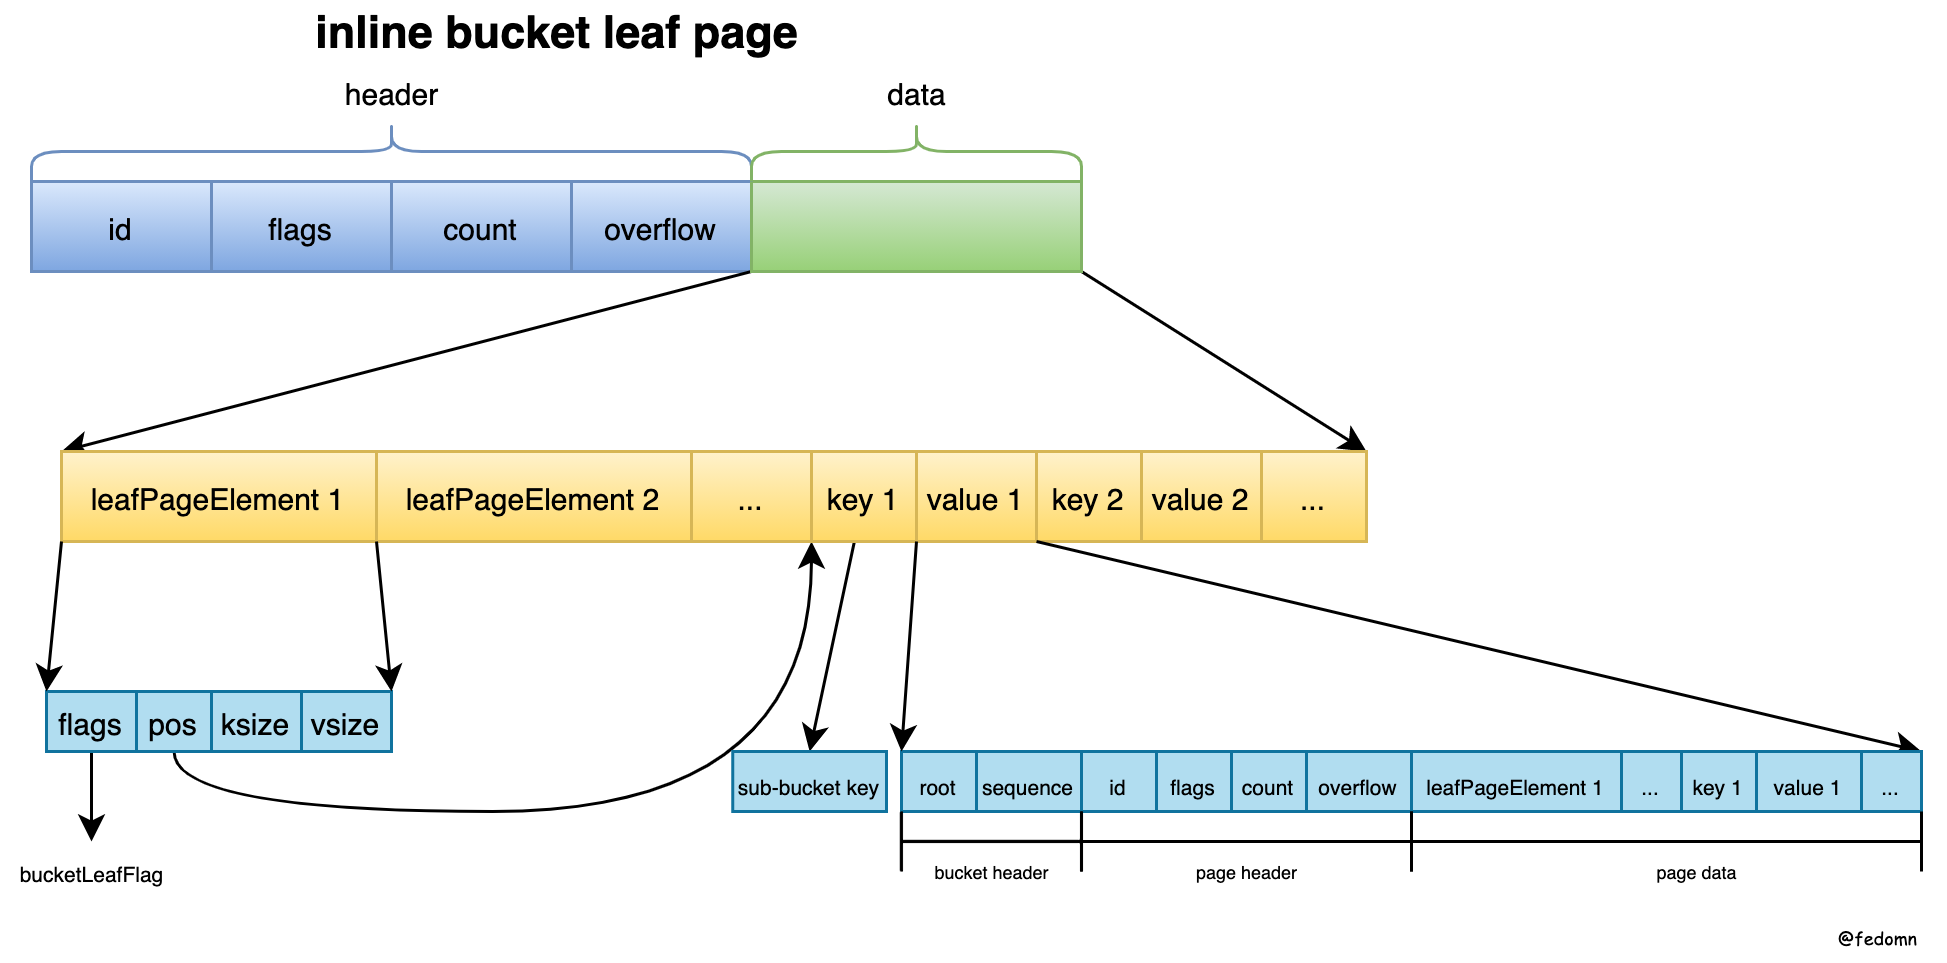
inline bucket leafPage相对于sub-bucket leafPage来说,主要是当sub-bucket中的数据很少时,在单独一个page会造成空间浪费,所以将一个sub-bucket整个page通过inline到parent的page里
索引操作
BoltDB是一个基于B+Tree组织的数据库,一个DB文件就是一棵树。但和普通的B+Tree相比,BoltDB 没有使用链表将所有叶子节点串在一起。为了支持对数据的顺序遍历,额外实现了一个 curosr 遍历逻辑,通过保存遍历栈来提高遍历效率、快速跳转。
BoltDB事务中的所有操作都是在内存中,来操作内存的B+Tree node,直到事务提交时刻,才会进行B+Tree的平衡操作,不太清楚平衡操作的可以看我前一篇B-Tree History。其中主要的操作就是spill和rebalance。
spill
node.spill的核心是,将过大的node拆分,并写入dirty node
如下代码从Tx.Commit -> Bucket.spill -> node.spill
| |
核心逻辑如下:
- Tx.Commit中执行spill写脏页
- Bucket.spill中,自下而上 递归 spill sub-bucket
- node.spill中,自下而上 递归 spill children node,spill的逻辑是将node根据pagesize进行拆分,进而写入新分配的page(此时还未写磁盘)
注意:
boltdb使用COW 的方式对节点进行修改,以保证不影响并发的读事务。即,将要修改的 page 读到内存,修改并调整后,申请新的 page 将变动后的 node 落盘。
这种方式可以方便的实现读写并发和事务,但无疑,其代价比较高昂,即使一个 key 的修改 / 删除,都会引起对应叶子节点所在 B+ 树路径上所有节点的修改和落盘。因此如果修改较频繁,最好在单个事务中做 Batch。
boltdb 对 B+ 树的生长以事务为周期,而且生长只发生在写事务中。在写事务开始后,会复制 root bucket 的根节点,然后将改动涉及到的节点按需加载到内存,并在内存中进行修改。在写事务结束前,在对 B+ 树调整后,将所有改动涉及到的 node 申请新的 page,写回文件系统,完成 B+ 树一次生长。释放的树节点,在没有读事务占用后,会进入 freelist 供之后使用。
疑问:spill会对所有的node都进行吗?哪里进行的过滤呢?
答案是:在bucket#put函数里,有一个很重要的代码,如下
| |
它的逻辑,就是通过cursor去查询B+Tree,然后在在第7行,通过c.node()函数来得到 待插入的node,如果该node还没从page加载到内存的node,则通过bucket#node函数来加载该page,然后将该node放到parent.children中,如下
| |
所以,这就可以解释了,为什么代码里看到的是for-each rootNode的children,因为这个children已经是cursor遍历过的node了,所有需要重新写磁盘。
rebalance
node.reblance的核心是,将过小的node与sibling合并
如下代码从Tx.Commit -> Bucket.rebalance -> node.rebalance
| |
node.reblance逻辑如下:
将node#del方法里记过unbalanced的node 并且 该node的size或keys个数,任一个小于阈值;二者同时满足时,表明该node需要填充了。
将leftSibling或rightSibling与当前node merge在一起。注意:这就和上面B-Tree History里说的borrow sibling一个key有一些区别,因为我们操作的都是一个page。
事务实现
Atomicity 原子性
Atomicity : “all or nothing” - multi statements in a transaction executes completely or not at all.
主动rollback。BoltDB操作遇到异常时,主动执行 tx.rollback,来undo所有操作。
其中的逻辑:
- 回滚正在使用的freelist的pending page
- 通过DB.page来重新构造freelist数据结构
- 最后释放
相关锁和 清除Tx引用释放内存,这里的锁要分 只读事务 和 读写事务。对于只读事务,需要释放mmaplock和metalock。对于读写事务,需要释放rwlock。
被动异常。BoltDB读写事务执行到一半时掉电重启,如在commit阶段,刚写完dirty pages,正在写meta page时掉电重启。这时如何保证原子性呢。
我们知道BoltDB采用的COW机制,所以更新操作会创建新page 再进行写文件,而老的page则不去改动,但会标记成free。所以BoltDB通过freelist结构来记录老的free page,对这些free page,尽管物理上有值,逻辑上它已经是free的了,仍然可提供给新的node写入。
到这里就回答了上面的问题,BoltDB是通过meta page的写入成功来表保证事务的原子性。如果meta page写失败,则BoltDB新写的page增量对用户来说不可见,也就是实现了事务的原子性。
Consistency 一致性
Consistency : once a transaction has been committed , the data must conform to the given schema. (保证database的invariants,即满足rules,constraints cascades trigger,保证数据的valid stage)
我们这里说的一致性特指单机数据库场景下,事务前后 数据库仍然能够保证 一些不变性,如外键、column check、级联trigger等。BoltDB场景下,作为一个KV没有自定义约束,它的一致性体现在,事务前后,数据库page、freelist和meta仍然是满足rules正确的。这里解释有点牵强,一致性更像是建立在KV之上的应用层约束,这里就不展开了。
Isolation 隔离性
Isolation : concurrency control. Ensures concurrent transactions execute separately from one another.
数据库有了并发操作,就会引出了隔离性问题,不同的隔离级别,来保证不同事务之间的可见性。
一般我们说隔离级别指的是:Read Uncommitted(读读未提交)、Read Committed(读已提交)、Repeatable Read(可重复读)、Serializable(序列化)。这些隔离级别依次变强,隔离越强也就代表性能越差,最终结果就是串行操作。
对于BoltDB来说,只允许single writer 和 multiple readers。也就是说,BoltDB支持多个读事务 和 一个写事务 同时执行。 只要写事务创建的新page 在commit完成前,不会被 读事务 读取到,就能够保证RR的隔离级别,其中关键点是meta page,它是数据库信息组织的核心。
这里会依次看 只读事务 和 读写事务
只读事务
| |
上面代码的几个核心点:
a. 开启只读事务时,会短暂lock meta,主要来复制meta信息 到 tx中,用于后续读取page
b. 获取mmaplock的read-only lock。这是读事务唯一会阻塞写事务的地方。因为写事务在allocate新的page时,如果当前文件大小 不够分配free page,就要grow文件,并重新mmap映射。
所以,写事务 在re-mmap时会先获取mmaplock的exclusive lock,来阻塞读事务初始化,同时读事务的初始化也会阻塞写事务的re-mmap操作
c. db.txs会记录所有的 只读事务。由于读事务txid = db.meta.txid,写事务txid = db.meta.txid + 1,当commit后,才会更新txid。
这么看来,事务txid 相当于 数据的版本,每次操作数据库时,都会先获取这个逻辑上的版本。这么做的原因:由于写事务会对数据版本进行更改,由于COW的方式,旧的page会放到freelist.pending中等待释放,注意pending的数据结构是:map[txid][]pgid。
所以,txid就可以相当于 某个时刻的数据版本,pending中记录的是这个txid时刻(注意txid只会是写事务),旧的待释放的page。但释放这些旧page的时机BoltDB放在了,写事务开启的时候。后面会介绍。
读写事务
| |
核心点:
a. 首先获取db.rwlock来保证single writer
b. 短暂的metalock来包含meta page,同时开启读写事务
c. 找到db.txs中最小的min-txid,释放freelist.pending中所有txid小于min-txid的pending page。
这一点对应了只读事务中的db.txs保存操作。上面遗留了一个问题,为什么BoltDB把freelist.pending的释放操作,放到了读写事务开启阶段,能不能在commit阶段将freelist.pending释放。
逻辑上,是可以在commit阶段释放freelist.pending的。但是为了保证isolation,就要保证 写入freelist和metadata 的时候,不能有 新的只读事务进行。
否则就会出现不一致的状态,内存中db.freelist上的pending已经释放了,但还在写入page。此时新起的 只读事务读取到的 metadata可能还是上一次事务的metadata,对应的freelist也是上一次事务的。这是,database的freelist状态就不唯一了。所以,在释放freelist.pending时,会获取metadata lock来保证
Durability 持久性
Durability : the ability to recover from an unexpected system failure or outage
BoltDB体现在:写事务修改的数据,都会先分配新的page,来写入文件,不直接修改源page。同时,通过metadata的写入成功来保证了,写阶段的任何异常发生,只有metadata不变,数据库都是可恢复的,回到上一个事务状态
代码实现
记录一些关键点
内存对齐
0x00.
操作系统为了读取效率,并非是一个字节一个字节去访问内存的,而是按2, 4, 8这样的字长来访问。如 64位系统是8字节(8 byte)的长度来读取内存。
所以持久化数据结构struct时,会将整体数据长度对齐,方便操作系统高效地定位数据,无需多次读取、处理对齐运算到struct里、等等这些额外操作。
举例来说,一个golang里的struct,它会占用多大内存?
| |
所以,unsafe.Alignof结果看出,对齐的大小是struct.filed中的最大值。
对应到BoltDB中,page也是内存对齐后存储到磁盘上的。所以,我们通过unsafe.Sizeof方法来获取struct长度,然后计算长度,再来获取后续数据。如
| |
0x01.
golang中slice我们知道是一个array包装后的数据结构,因此通过unsafe.Pointer这种操作,需要直接指向底层地址的时候,我们要获取slice真实的array地址,方式是: slice[:]。即:buf[:] to get slice struct array address
0x02.
golang中Turning C arrays into Go slices,
BoltDB中需要将底层mmap出的array指针,转成一个slice,提供后续操作。golang wiki里提供一种方式:(*C.YourType)(unsafe.Pointer(theCArray))[:length:length]。注意,这种方式产生的slice,它的内存是不受go垃圾回收器管理的。但是,这块array空间在BoltDB中是mmap产生管理的,所以情况和wiki中不一样。
具体可以查看issue
最后,有了BoltDB中array to slice方法如下
| |
maxAllocSize
BoltDB中存放一个常量maxAllocSize,用来创建一个array pointer时的size。
const maxAllocSize = 0x7FFFFFFF,这是一个16进制数,将7转换一下就是 7 -> 0111,所以推出 0x7FFFFFFF -> 31bit。也就是说最大array size是一个int32值。它最大能存储的内存换算下来就是2GB。
分析原因,golang int最初设计成32bits wide。而array的len(x)返回值就是int,所以它的最大长度受限于int的宽度。
详解
如今,golang int已经改成64bits wide了,所以这个maxAllocSize理论值可以扩展到0x7FFFFFFFFFFFFFFF,显然这已经超过了物理机内存最大值了。
BoltDB中,也有对此的解释,see commit id: b9c28b721ad8186bdcde91c8731ed87d65c6554d
Increase max array size to 2GB.
This commit changes the maxAllocSize from 256GB to 2GB to handle large values. It was previously 0xFFFFFFF and I tried adding one more “F” but it caused an “array too large” error. I played around with the value some more and found that 0x7FFFFFFF (2GB) is the highest allowed value. This does not affect how the data is stored. It is simply used for type converting pointers to array pointers in order to utilize zero copy from the mmap.