Identity and Access Management
Identity and access management (IAM) is the security discipline that enables the right individuals to access the right resources at the right times for the right reasons.
IAM发展历程 & IAM管理
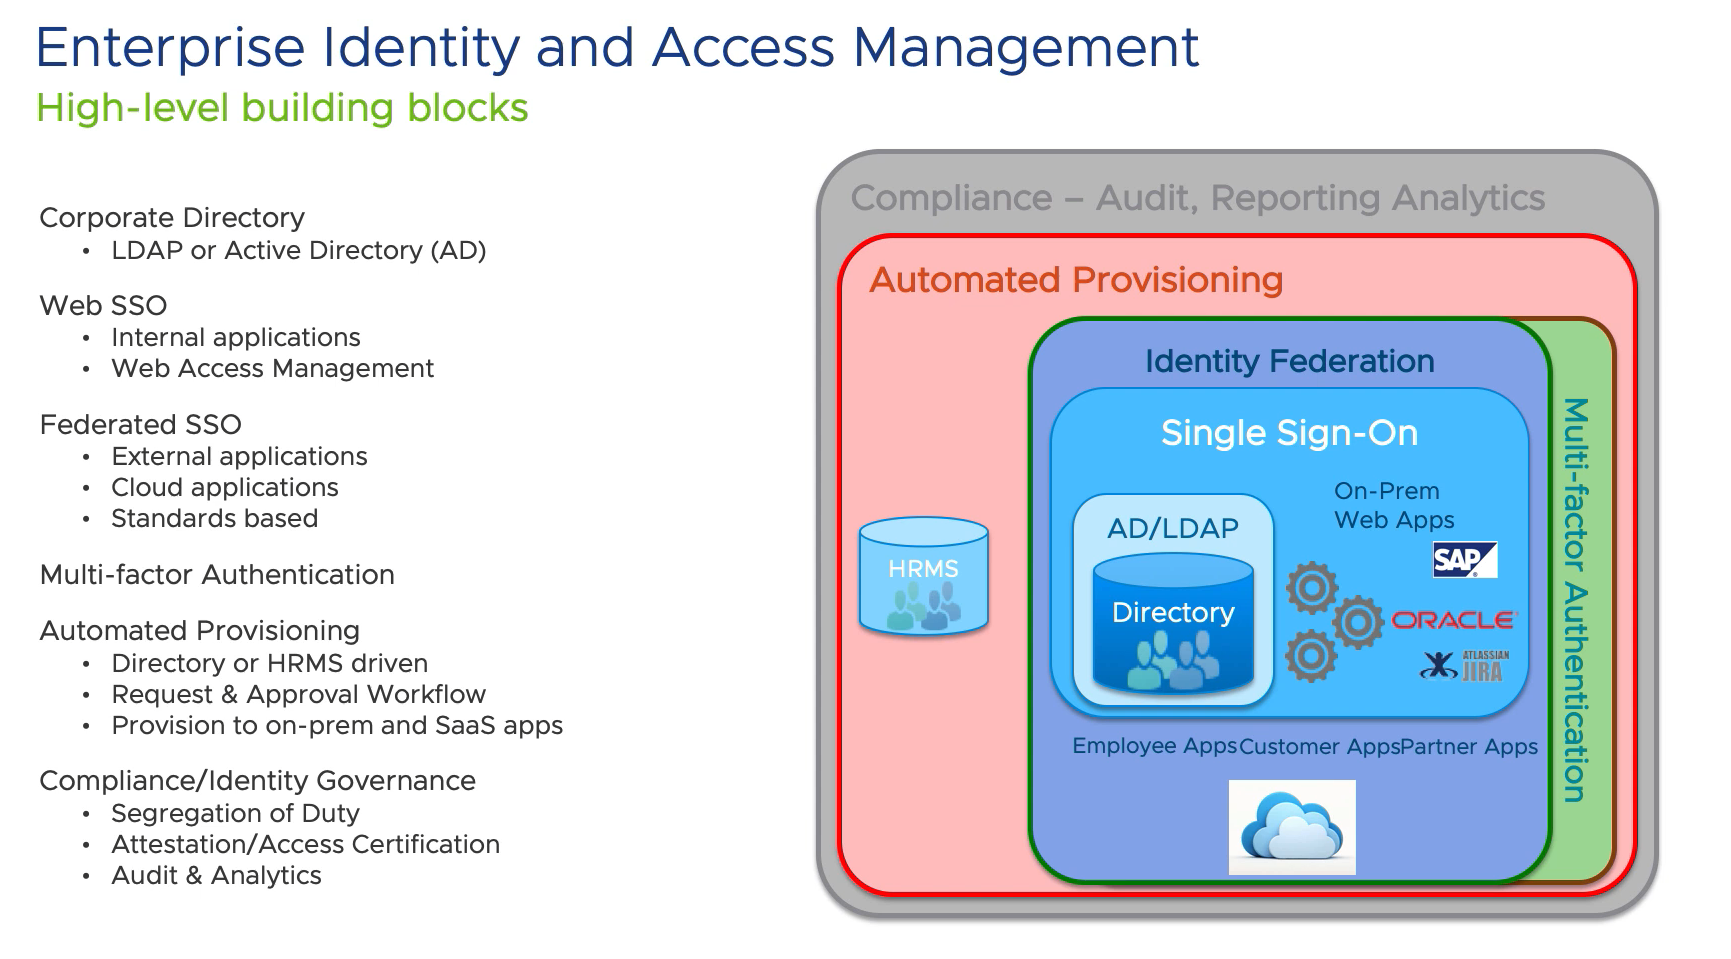
Corporate Directory (数据源)
- LDAP or Active Directory (AD)
Web SSO (non-standard方式实现SSO)
- Internal applications
- Web Access Management
Federated SSO (standard SSO方式, 标准化更多应用)
- External applications
- Cloud applications
- Standard based
Multi-factor Authentication (MFA实现更高的trust级别)
Automated Provisioning
- Directory or HRMS driven
- Request & Approval Workflow
- Provision to on-prem and SasS apps
Compliance / Identity Governance
- Segregation of Duty
- Attestation / Access Certification
- Audit & Analytics
Authentication & Authorization
Authentication
- The act of proving who you are
- Often referred to as AuthN (AuthN – Authentication is establishing the your identity)
- Common methods of AuthN
- Form based authentication (username / password)
- Multi Factor AUthentication (MFA)
- Certificate
Authorization
- The act of granting someone access
- Often referred to as AuthZ (AuthZ – Authorization is establishing your privilege)
SSO的出现
一图胜千言,基础的IAM:
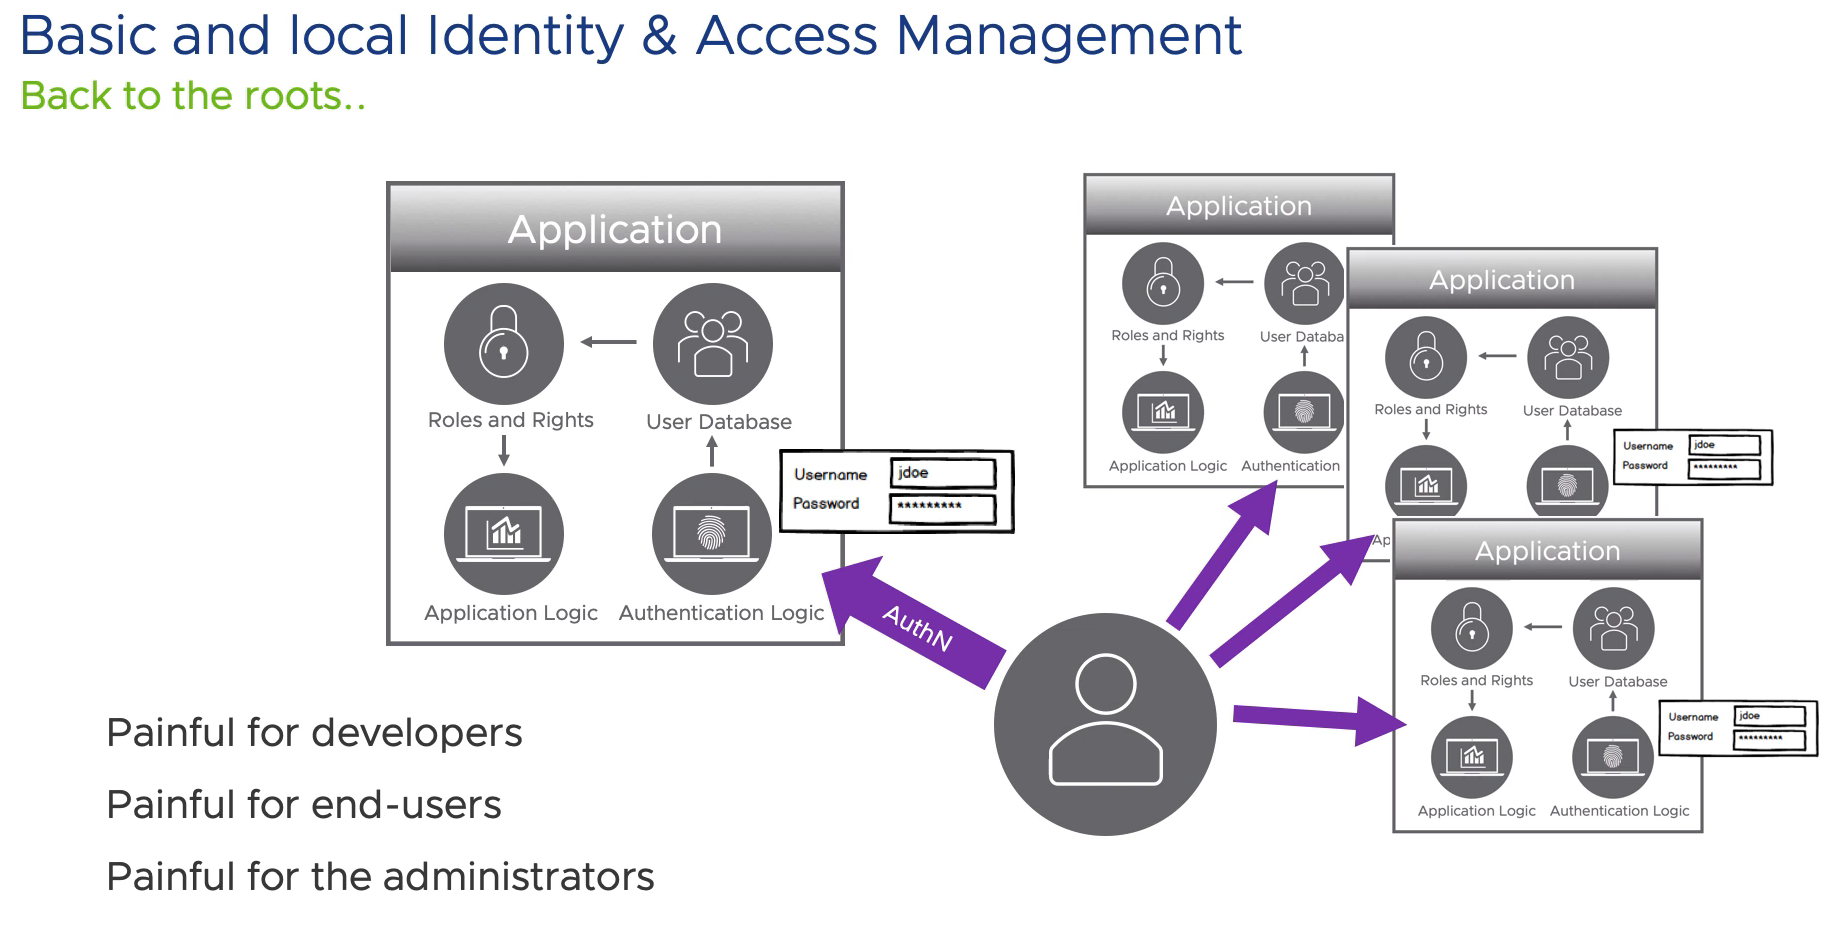
痛点有了,进而进化出现代IAM: 基于claims的IAM
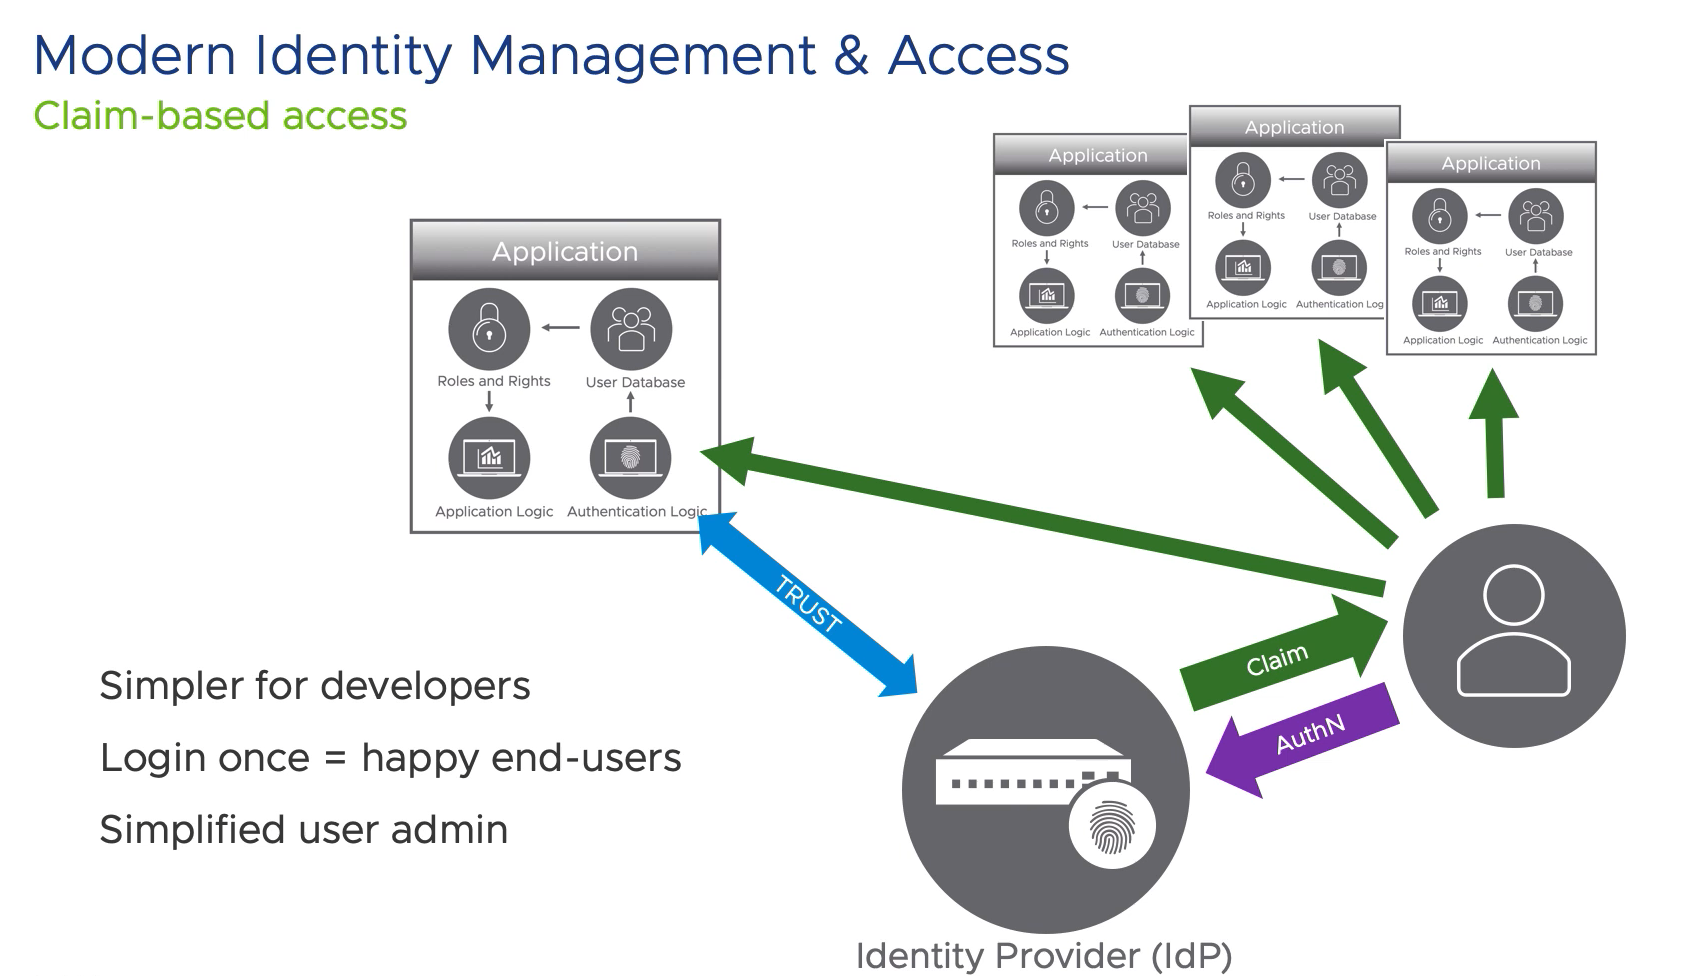
其中IDP承载着用户信息,它与application之间建立trust,进而交互用户信息
IDP作为受信任的provider,让我们实现了SSO的能力
IDP的类型,也就是我们开发中 一般会集成的类型:
- SAML identity provider
- OpenID provider
下面会依次详解SAML和OpenID
SAML
Security Assertion Markup Language:基于XML的数据交换在AuthN和AuthZ过程中。
SAML主要用于 web-browser single sign-on. 我们知道在一个security domain里,可以通过cookie来保持用户状态,但对于across security domains来说(一个公司里多个系统),就很困难通过共享用户状态。
因此,SAML Web Browser SSO 被提出成为标准.
了解SAML history方便更好记忆:
- 最初AuthN和AuthZ需要一套standard去规范Internet上的applications,OASIS委员会征集基于XML的方案
- 2002年,OASIS基于民间方案提出SAML1.0。同时Liberty Alliance propose基于SAML的extension SSO 框架 ID-FF
- 2005年,最终的SAML2.0成为标准
base
理解SAML,需要了解它基于的技术:
- XSD:XML Schema Definition. 你看到Request/Response Schema 定义规则来源于它。XSD namespaces分析
- XML Signature:XML数字签名语法,用于SOAP/SAML。Signature分析
- XML Encryption:定义了如何加密XML内容。使用KeyInfo。
- SOAP:Simple Object Access Protocol。基于XML结构的信息交换协议
SAML分为三大块:
- SAML Core: 定义assertions,定义protocols组织SAML elements
- assertions: Assertion A was issued at time t by issuer R regarding subject S provided conditions C are valid. 它一般用于IDP发送消息给SP,通常assertions包含三个statements让SP判断principal是否可以access
- Authentication statements: 表明principal已经AuthN了IDP
- Attribute statements: principal关联的主要属性
- Authorization decision statements
- protocols: 组织SAML elements的协议。如request/response元素应该怎么处理
- Authentication Request Protocol
- Artifact Resolution Protocol
- assertions: Assertion A was issued at time t by issuer R regarding subject S provided conditions C are valid. 它一般用于IDP发送消息给SP,通常assertions包含三个statements让SP判断principal是否可以access
- SAML Binding: mapping映射,将上面的protocols通过技术手段实现
- HTTP Redirect (GET) Binding
- HTTP POST Binding
- HTTP Artifact Binding
- SAML Profile: SAML的最佳实践方式,如基于Web Browser SSO
assertions
| |
主要elements:
<saml:Issuer>: IDP标识<ds:Signature>: 关于<saml:Assertion>元素的完整数字签名,详情点击上面Signature分析<saml:Subject>: 标识登录的principal<saml:Conditions>: assertion valid的条件,其中audience表明SP<saml:AuthnStatement>: 描述IDP的验证操作(IDP验证的时间/验证的ID)<saml:AttributeStatement>: 登录用户的属性
上面的Assertion,总结来就是:
IDP于2004-12-05T09:22:05Z issue了一个 assertion b07b804c-7c29-ea16-7300-4f3d6f7928ac ,给subject 3f7b3dcf-1674-4ecd-92c8-1544f346baf8 用于登录 SP https://sp.example.com/SAML2
到此,assertion,也就是IDP给SP的Response清楚了,就可以在写代码前debug数据了,后面还需要清楚SAML2.0的Request
protocols & binding
Authentication Request Protocol
SAML1.1中,Web Browser SSO 由 IDP先发起,传递一个<samlp:Response>给SP,注意这是IDP initialize
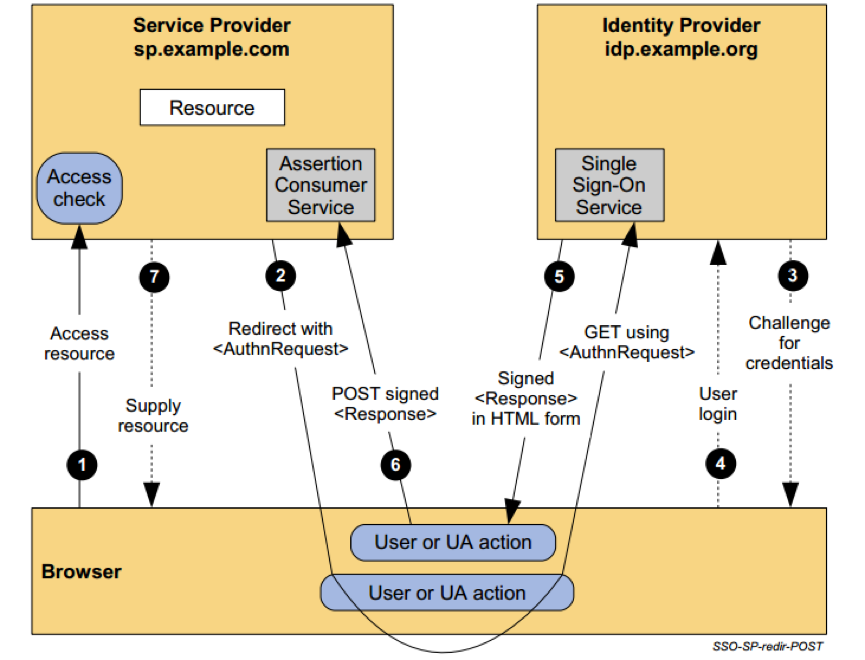
SAML2.0中,Web Browser SSO 由 SP先发起,issue 一个 request 到 IDP,这个request由<samlp:AuthnRequest>元素标记,包含issuer(SP),principal验证过后,IDP通过browser传递response给SP
| |
其中issuer就是SP标识,它通过浏览器传递(传递方式见binding) 给IDP,表示我SP想要一个assertion。
关于bindings,也就是如何技术实现Authentication Request Protocol
一般有HTTP Redirect Binding 和 HTTP POST Binding
HTTP Redirect Binding
通俗说SAML protocol message加在URL query string上,如 https://idp.example.org/SAML2/SSO/Redirect?SAMLRequest=fZFfa8...。由于URL长度限制,browser能传递的信息有限,所以一般传递SAMLRequest,当然samlp:AuthnRequest 需要URL-encoded
HTTP POST Binding
SAML protocol message传递在POST payload中,所以一般大小还是够用的,没有URL长度限制。
SAMLRequest和SMALResponse都可以通过POST form进行传递,如
| |
特殊情况,由于SAMLResponse需要browser自动传递给SP,workaround通过window.onload submit
如下的HTTP Post Binding
Artifact Resolution Protocol & Artifact Binding
疑问来了,有了Web Browser传递,我们为什么还需要Artifact,参考
简要说来,browser有些缺陷:
- limitation of Get Query String / Post payload size
- no support for JS auto-submitted forms
- sensitive data pass through browser
- 修改data给XML Signatures产生XML wrapping attacks
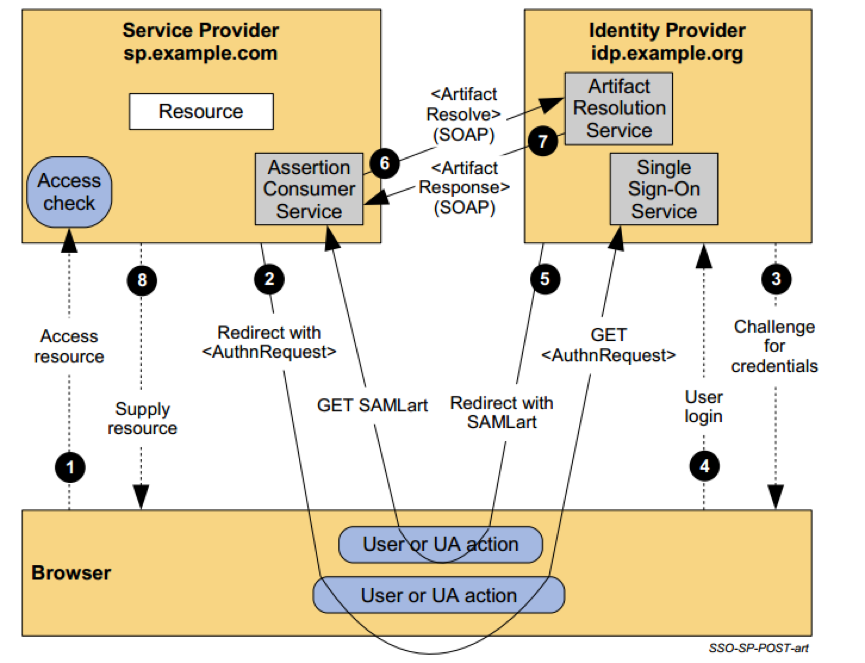
为了解决这些缺陷,就是减少browser传递信息,所以提出用artifact(计算出的不可逆hash),通过browser传递artifact,IDP和SP就可以通过这个artificat私下通信交换用户信息。 也就是ArtifactResolveRequest 和 ArtifactResponse。
通常artificat可以由IDP发送给SP,即IDP要求SP发送AuthnRequest,也可以IDP->SP / SP -> IDP 都用Artifact Binding,参考.
也可以是SP发送给IDP,用于交换用户信息,如下flow,也是我们经常集成的SSO一种方式
SAML2.0 Artifact Binding
metadata
SAML的好帮手,在SP和IDP 之间 建立 trust。
如下示例:
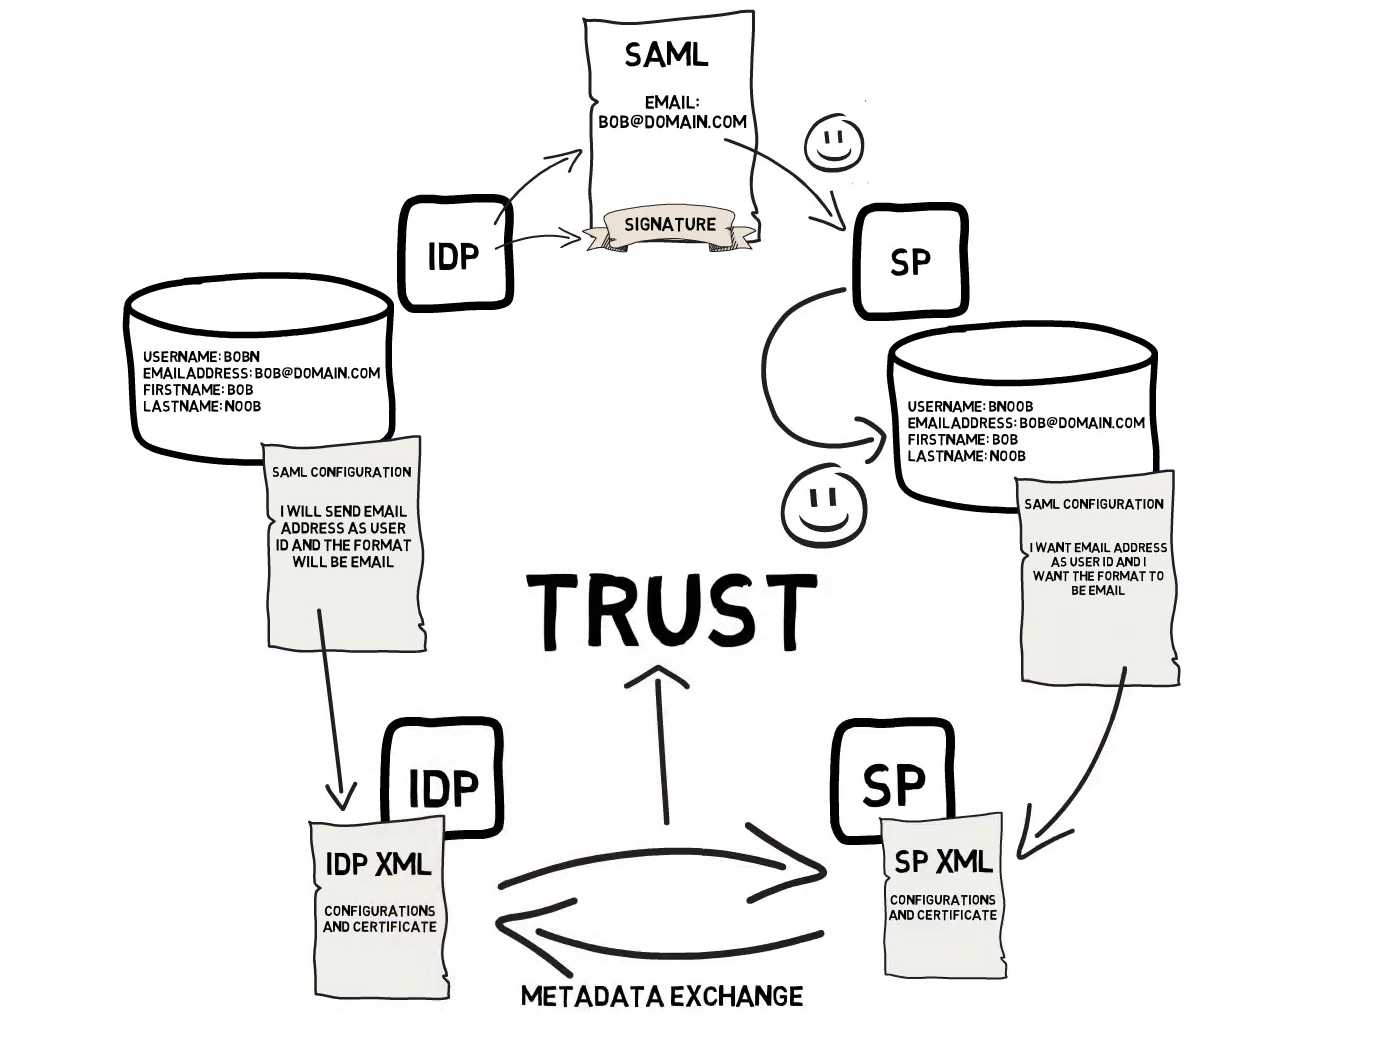
一个SP metadata例子
| |
依次介绍elements:
- md:EntityDescriptor:IDP或SP的描述信息都在这个element修饰下
- entityID:IDP或SP的标识符
- ds:Signature:用户保证整个XML被篡改
- ds:SignedInfo:
- SignatureMethod / CanonicalizationMethod:算法保护SignatureValue被篡改
- Reference:
- URI:引用被签名的资源(整个EntityDescriptor)
- transform:按顺序签名的算法
- DigestMethod:hash算法
- DigestValue:hash的结果,摘要信息
- SignatureValue:通过上面的签名算法,将hash结果进行 私钥加密,得到最终的签名结果
- ds:KeyInfo:提供的公钥,用来解密SignatureValue得到DigestValue,进行比对
- ds:SignedInfo:
- md:SPSSODescriptor:
- md:KeyDescriptor:两种type:signing和encryption,SAML message的加密和签名 对应的公钥
- md:NameIDFormat:表示SAML NameID格式
其他element可以参考SAML-metadata-2.0
为什么签名是对信息hash之后加密,而不是加密一些特定的字符? 这是因为防止中间人尝试向私钥拥有者反复发送一些特定的字符,得到加密后的信息,达到破解或者伪造之类的目的。所以用私钥随便加密信息是不安全的。
同理,IDP的metadata不做解析,参考ssocircle-metadata-idp
java code
集成框架: Spring Security SAML Extension 集成Demo: SSOCircle 与 Samples using spring-security-saml
其中关键点:
- SSOCircle上生成entityID,并填入metadata(注意删去Signature部分)
- samlKeystore.jks生成的方式,如果不在ExtendedMetadata里明确指定SigningKey和EncryptionKey,使用的是JKSKeyManager的defaultKey(在上面SSOCircleDemo中,我们使用的是一个Cert,即SigningKey=EncryptionKey,真实环境可以需要调整)
附上简易版的samlKeystore.jks生成过程
| |
fine-grained access control
从saml2的history,它主要解决了describe/exchange security information。
如果你的系统所有user都是一样的权限,那么SAML2就可以了,它有SP的AuthN,也有IDP的AuthZ。(重新认识Authentication和Authorization这两个意义)。
继续,User通过IDP后,Authorization Assertion只有一些基础的用户信息(一个SSO IDP不可能包含所有SP需要的细粒度权限)。
问题来了,真实系统中,users不可能都是一样的权限。我们需要细粒度的access control,所以需要在SP中实现这套控制。
换成代码来说,细粒度的protect REST APIs,由于REST stateless特点,对application来说,有两种方式让HTTP call携带用户权限信息。
- Session:APP通过Request Header里的cookie拿到session id,再从存储里找出user infor进而判断是否有权限访问API。弊端,backend需要存储session info来实现有状态的HTTP Call
- Token:APP通过Request Header里Authorization Bearer拿到token,里面包含了user info,进而实现有状态的HTTP Call
代码实现:
上面两种都可以自己写验证flow,然后集成在Spring Security里。同时Spring也提供了具体的框架,你只要配置就可以实现flow。
这里只说基于token的access control。
首先,这里几个误区:
OAuth2
先是History:详细版
- 2006年,OAuth始于Twitter在开发OpenID时。同年一个web网站需要一个方案:让它的用户,授权Apple的Dashboard应用,来拿去它的数据。这些开发者与Twitter一起讨论,发现目前没有一种标准:API Access Delegation without sharing their username and password (注意这里的
API,理解与SAML的区别) - 2007年,OAuth小组成立。并起草了最初版。2010年发布1.0版本
- 2012年,发布2.0版本。相比1.0的web based,2.0它的flow适用于web / desktop / mobile / IOT。相比1.0的signed-token,2.0只有barrier-token。
characteristic :
- OAuth:One of these was a smaller learning curve
Delegated authorizationis the core of OAuth, and that is granting someone or some application permission to act on your behalf
它的出现本意是:一个应用 允许 另一个应用 在 用户授权的情况下,可以访问自己的数据。 举例来说,你点了批准后,Google 允许 GitHub 获取你的Google头像。
一个非常好的OAuth2 simplest guide,感受下,Authorization Server是如何issue token
一个直观的OAuth2 issue token flows,感受下,Authorization Code Flow的一次性code
其中的一些概念:
- Resource Server:等于 SP。用户请求的资源,如何verify token
- Client:等于 User Agent (browser 或 mobile 或 三方application)
- Authorization Server:等于 IDP。发放用户信息的地方。也可以说是发token的地方。
注意,上面的三个都可以理解成 独立存在的服务。映射到这三个概念来说:
- Spotify 想要你的 Google 的 friends list
- 你被Spotify Redirect 到 Google 的 Authorization Server
- 你授权后,Google 的 Authorization Server 会Redirect给Spotify 一次性code 来换取 token
- Spotify 换到 token后,就用这 access token 去 Google 的 Resource Server 拿去friends list
对于大规模服务的公司来说,只需要一个Authorization Server,但可能会有很多Resource Server,如Google Map、YouTube等。作为Client需要从不同Resource Server拿信息。
如果你的规模较小,是可以将Authorization Server 和 Resource Server 放在一个服务里的。 这也就是,我们经常看到使用Spring-Security-OAuth2时,都配置了AuthorizationServer 和 ResourceServer。ResourceServer用来配置filter资源URL之类,AuthorizationServer用来配置issue token相关。
到这里,重新审视我们之前的误区,OAuth2 Specification究竟是什么?
一个Specification,一个规范,大家遵循这个规范,方便不同应用 之间 互相交换信息。
至于我们一般在做到SSO中,需要 浏览器 和 后端APP 交换信息。也就是说,需要一个authorization flow,issue一个Access Token(包含user权限),让browser携带token去访问backend APP。至于你这个授权流程怎么做,都可以,有很多不同的框架或规范提供选择。而我们选择了基于OAuth2的授权规范和Spring-Security-oauth2框架 而已。
OAuth2 with SAML2
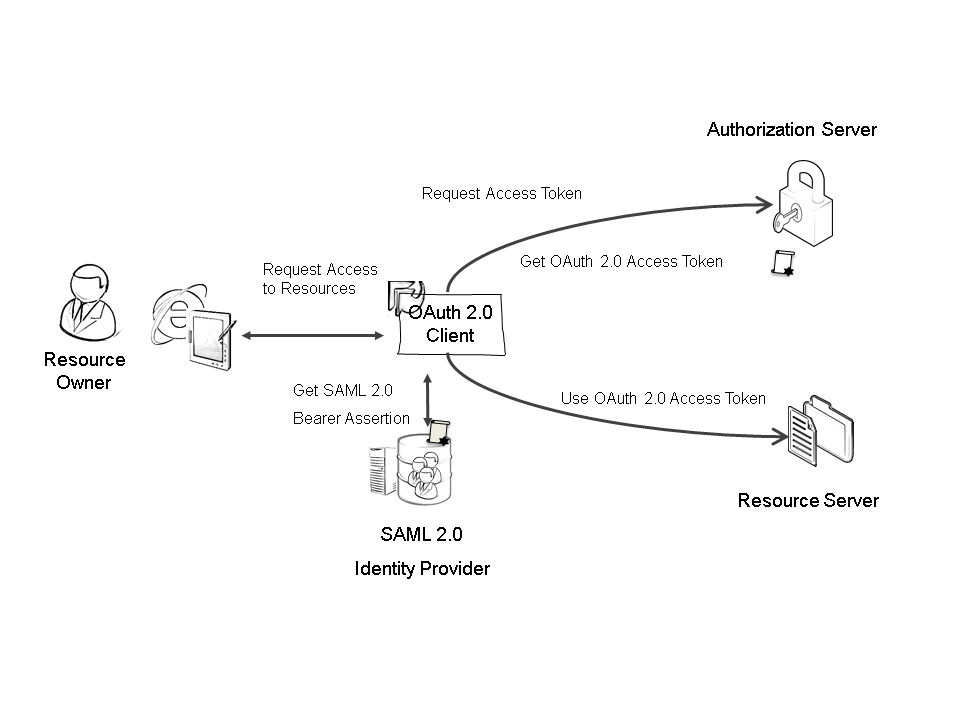
我们在做SSO时候,怎么将SAML2 AuthN 和 OAuth2 AuthZ结合起来?直观想法:SAML2 成功后callback到SP,在这个callback里我们response一个OAuthToken;或者通过一个bridge code 来桥接SAML和OAuth流程。
还是那句话,SSO和OAuth2的本意,有些不一样,至于灵活组织具体还是要细化到代码,而不是空谈流程。
如下简单结合的flow:
OpenID
OpenID,OpenID也作为一种provider,让我们实现SSO的能力。它本质也是一个framework,让Relying Parties和Identity Provider之间安全交流信息。
OpenID Connect
OpenID Connect是第三代OpenID技术,建立在OAuth2.0之上的Authentication layer。
OpenID的flow参考:Diagrams of All The OpenID Connect Flows
- JWT Signature – JWS
- JWT Encryption - JWE
SpringSecurity
最后,我们需要集成SAML和OIDC flow,就需要框架 来减少处理 协议的代码。
SpringSecurity,提供一系列的filter来处理Security,还包含一系列的Components来满足 开箱即用的 功能。功能很强大,同时带来了复杂度。
个人觉得,功能/概念越多,复杂度越高,带来了陡峭的学习成本。而用户想要的只是一个API filter,框架给了你10几个filter。 除非你非常清楚框架在干什么,否则尽量不要用,尤其在性能与安全更高要求的场景。